Planning a cooking event for your team sounds fun until you’re standing in a kitchen with 25 people, two broken burners, and nobody sure who’s supposed to be chopping the onions. Building a truly effective interactive culinary experience workflow is what separates a memorable team building win from a chaotic dinner disaster. Whether you’re a corporate event planner mapping out your next offsite or a culinary enthusiast wanting to share your passion with a group, the right workflow turns raw ingredients and good intentions into genuine connection. This guide walks you through every phase, from early preparation to post-event debrief, with the structure and specifics you actually need.
| Point | Details |
|---|---|
| Start planning 8 weeks out | Secure your venue and dates early, then work backward through vendor and chef coordination. |
| Mise en place is non-negotiable | Organizing all ingredients and tools before guests arrive dramatically reduces mistakes and delays. |
| Document your recipes as structured data | Standardized recipe formats improve consistency across stations and make scaling straightforward. |
| Build food safety into every phase | The 2-hour rule for perishables and temperature control must be embedded in your event timeline. |
| Risk management protects the experience | Allergy labeling, backup equipment, and pacing strategies prevent common event derailments. |
A well-run cooking event doesn’t start on the day of. It starts weeks before, with a clear culinary experience planning process that removes guesswork from every phase. The prep work you do before anyone puts on an apron is what makes the actual cooking feel effortless and fun.
Not every commercial kitchen or event space works for an interactive cooking format. You need enough workstations for your group, proper ventilation, access to multiple heat sources, and ideally a layout where a chef-instructor can be seen and heard clearly. For 20 people, plan workstations in clusters of four to five.
Budget planning matters here too. A typical 20-person event budget breaks down roughly like this:
| Budget Category | Approximate Share |
|---|---|
| Venue rental | ~40% |
| Ingredients | ~20% |
| Chef or instructor fee | ~17% |
| Equipment | ~10% |
| Miscellaneous supplies | ~13% |
Venue rental is almost always your biggest cost, so lock that in first.
Cooking up a great event means following a recipe for readiness. According to planning best practices, this is the timeline that works:
Pro Tip: When hiring your chef, look specifically for someone experienced in chef-led interactive experiences with groups, not just private dining. Running a cooking class for 25 people is a completely different skill set than cooking for 25.
Finalizing your menu at six weeks out also gives you time to collect dietary restriction information from all participants before you order ingredients.
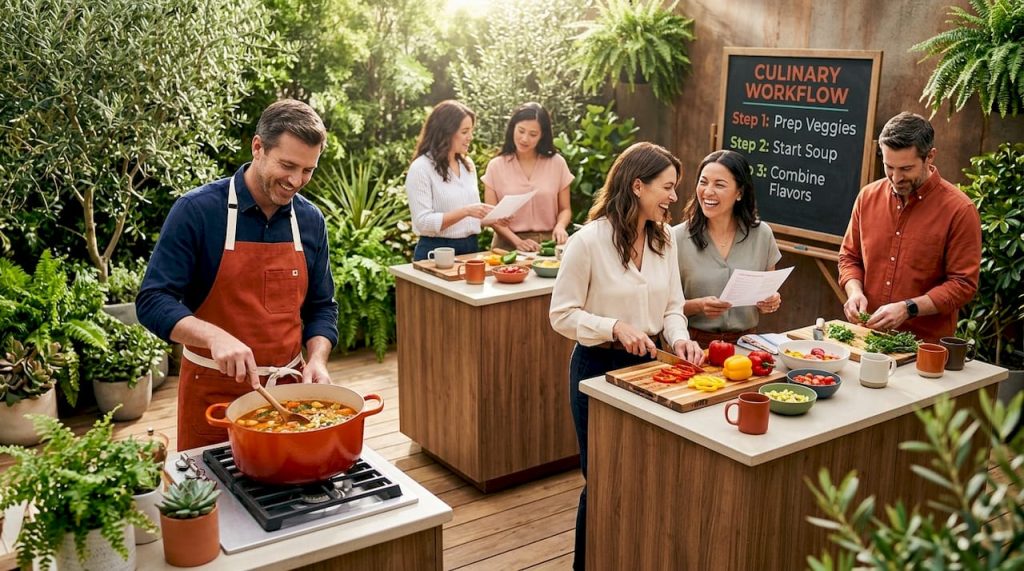
The execution phase is where your cooking workflow management either holds together or falls apart. A structured run-of-show keeps energy high and prevents the experience from losing momentum.
A well-structured 2-hour team cooking event follows these phases:
This structure works because it gives people just enough time to get comfortable before the cooking starts, and it creates a natural competitive tension that keeps teams focused.
Before your participants arrive, every station needs to be fully set. Mise en place, which means having all ingredients pre-chopped, measured, and arranged within reach, is not just a chef habit. It is the single most effective tool in your cooking workflow management arsenal. When participants sit down to organized, ready-to-use stations, they spend their energy cooking and connecting, not hunting for a cutting board.
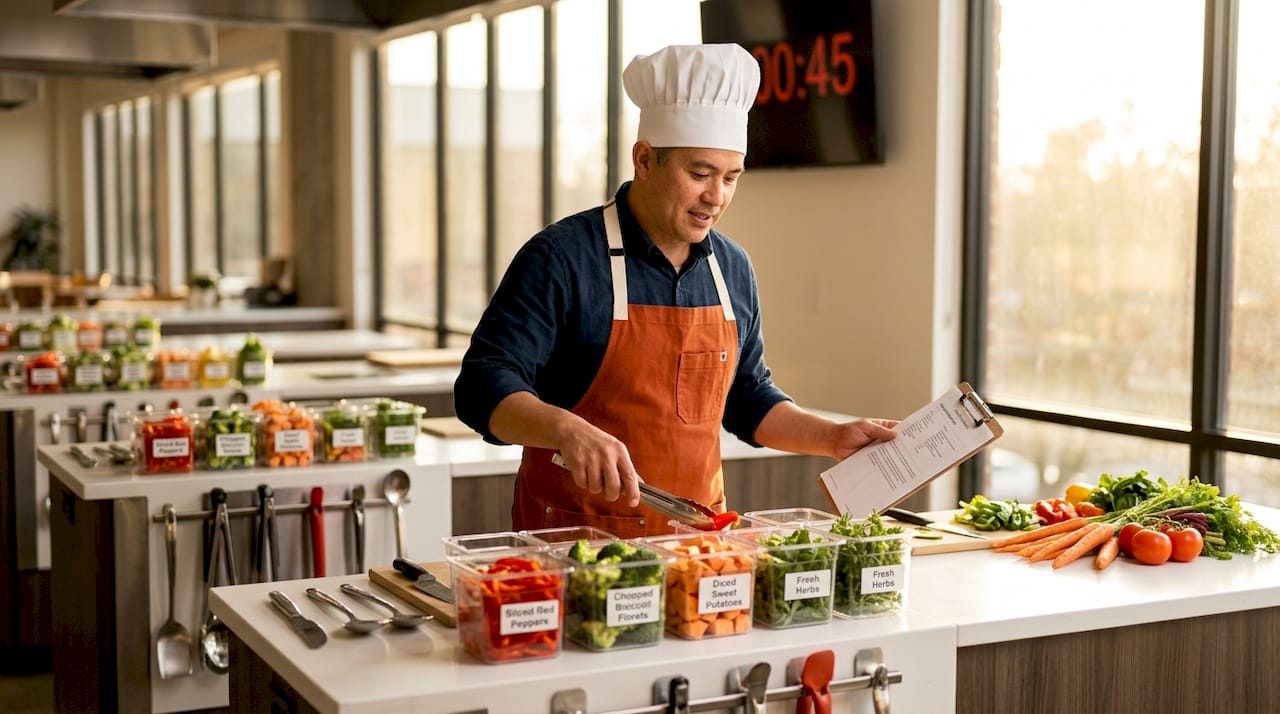
Assign your chef and any volunteers to complete full station setup at least 30 minutes before doors open. Label everything clearly. Group ingredients by dish component so teams can work through the recipe logically.
During the cooking phase, assign each team member a role at the start. One person leads the recipe, one manages timing, one handles plating, and others take on specific prep tasks. This mirrors how real professional kitchens operate and gives quieter team members a defined way to contribute.
Your facilitator needs to watch the clock actively. When teams fall behind, a quick station check-in keeps things moving without derailing the mood.
Food safety reminder: Perishable food must not sit at room temperature for more than 2 hours, and that window shrinks to 1 hour if the room temperature exceeds 90°F. Build ingredient staging into your timeline so food is not sitting out during the welcome and briefing phases.
Pro Tip: Prepare a physical “cheat sheet” for each station that lists the dish’s critical timing points. Simple, visible reminders like “sauce goes in at 30 minutes” prevent the most common mid-event mistakes.
One of the most overlooked elements in culinary experience planning is how you document and distribute your recipes. Generic printouts are a starting point, but a structured recipe format does far more for your event’s consistency.
Cooklang is a recipe markup language that structures each cooking step as a paragraph with attached metadata for ingredients, cookware, and time. That might sound technical, but the practical benefit is straightforward. When your recipes clearly tag each ingredient amount, each tool needed, and each timing checkpoint, you can auto-generate shopping lists, scale portions accurately, and hand recipes to different facilitators without losing detail.
For group cooking events, this kind of structured recipe format removes the ambiguity that causes station-to-station inconsistency. Without it, one team’s pasta dish ends up completely different from another’s not because they cooked differently, but because the recipe was interpreted differently.
The benefits of digital, structured recipe management include:
| Format Type | Consistency | Scalability | Facilitator Readiness |
|---|---|---|---|
| Printed recipe cards | Low | Manual only | Requires verbal briefing |
| Digital recipe sheets | Medium | Semi-manual | Better, but still interpretive |
| Structured data format (e.g., Cooklang) | High | Automated | Built into the format |
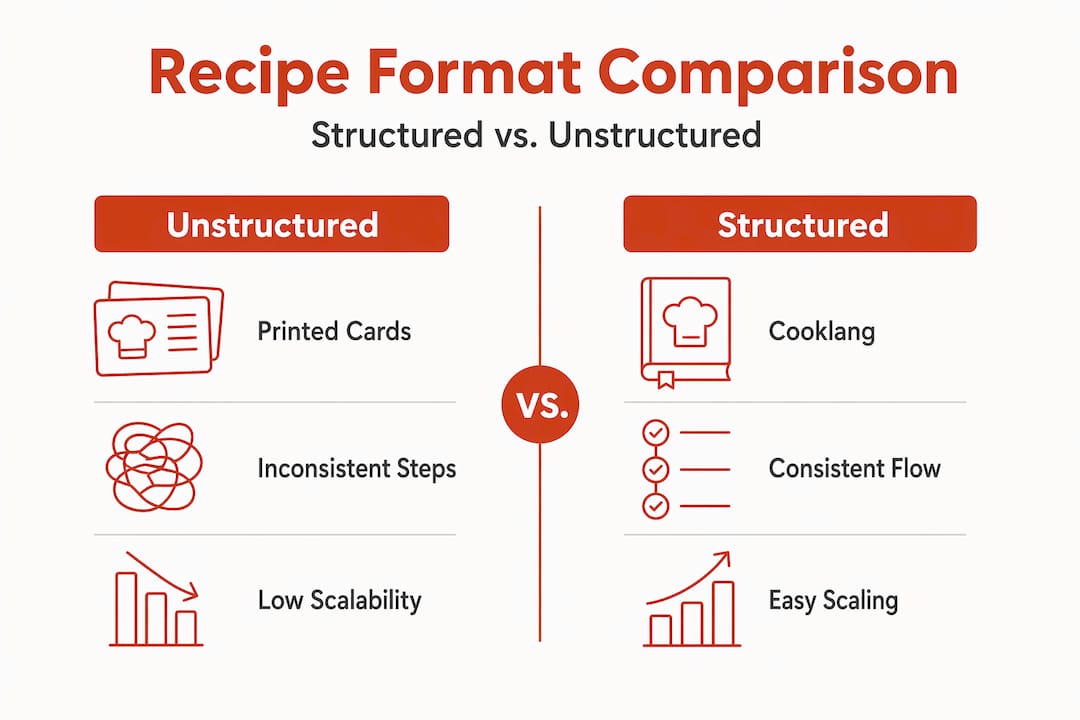
If you are running culinary workshops for teams regularly, investing in structured recipe documentation pays for itself quickly in reduced prep time and fewer errors.
Even the best-planned events hit snags. The difference between a minor hiccup and a full event derailment is usually how well your workflow anticipated the problems before they arrived.
Allergy management is not optional. Collect dietary restrictions from all participants during registration, and label every ingredient at every station clearly. While Natasha’s Law is a UK-specific regulation requiring emphasized allergen labeling on prepacked foods, its core principle applies to any group cooking event: allergens must be visible, legible, and impossible to overlook. Use bold text or color-coded labels at stations.
Keep an allergen matrix document in your event binder that cross-references each participant name with their restrictions. Your chef should review this before the event begins.
Pro Tip: Designate one person on your team as the “safety lead” for the event. Their only job is to monitor food temperatures, watch the clock on perishables, and flag anything that looks off. This role takes 10 minutes to brief and has saved more than a few events from becoming food safety incidents.
The HACCP-based approach to interactive cooking safety also means documenting your procedures before the event so facilitators are not making judgment calls on the fly.
I’ve seen a lot of cooking events that looked great on paper and fell flat in execution. The ones that consistently work share one trait: the organizer treated the workflow as seriously as the menu.
Here’s what most guides won’t tell you. The biggest enemy of a great team cooking experience is not allergies or equipment failures. It’s dead time. When teams finish a cooking phase early and have nothing to do, energy drains fast. The antidote is having micro-challenges or plating prompts ready to deploy the moment a team goes idle. Something as simple as “now decorate your plate to tell a story about your team” buys five minutes and generates genuine laughter.
I’ve also learned that the debrief phase is consistently underestimated. Most planners treat it as a wrap-up formality. But a well-facilitated 10-minute debrief where teams reflect on how they communicated, divided labor, and adapted under pressure is where the real team building payoff happens. The cooking is the vehicle. The debrief is the destination.
Scaling these experiences without losing quality is another challenge I’ve watched trip up planners who try to go from 20 to 60 participants by simply multiplying everything. The workflow does not scale linearly. You need more facilitators, more communication checkpoints, and a more detailed run-of-show. Exploring how to create culinary experiences at scale is its own discipline, and treating it as just a bigger version of the same event is the fastest way to a chaotic afternoon.
My take is simple. The apron is just the beginning. The workflow behind it is what makes cooking into connection.
— David
If building and managing a full interactive culinary experience workflow sounds like a lot to take on alone, that’s because it genuinely is. Recipeforsuccess specializes in exactly this. Their chef-led culinary challenge events handle everything from venue setup and recipe documentation to real-time facilitation and debrief, so you get all the team building benefit without the operational headache. Whether you are planning a corporate offsite for 15 or a company-wide event for 100, their food-based team building programs are built around the exact workflow principles covered in this article. Start the conversation and get your team in the kitchen.
An interactive culinary experience workflow is the structured sequence of planning, preparation, execution, and safety steps that makes a group cooking event run smoothly. It covers everything from venue selection and recipe documentation to real-time pacing and food safety procedures.
Start at least 8 weeks out to secure your venue, then work through chef hiring, menu finalization, supply orders, and participant communications on a staggered timeline leading up to the event.
Mise en place ensures every station is fully organized before cooking begins, which reduces mistakes, keeps teams on schedule, and lets participants focus on collaboration rather than logistics.
Collect all dietary restrictions during registration, label every ingredient clearly at each station, and maintain an allergen matrix document that your chef reviews before the event starts.
Perishable food should not remain at room temperature for more than 2 hours, or 1 hour in temperatures above 90°F. Build your event timeline to stage ingredients in temperature-controlled storage until each team is ready to cook.